
VideoX V4 Value Enterprise Quickstart Guide #
Windows Server 2022 #
What is included #
- One R4VE VideoX V4 Value Enterprise Appliance
- One Mini DisplayPort to VGA Adaptor
- Rackmount Rail Kit
Step 1 – Unpack the components
The VideoX V4 Value Enterprise Appliance is shipped with its hard drives installed. Operating system SSDs or database SSDs are also shipped installed. Carefully remove the VideoX V4 Value Enterprise Appliance from its shipping box.
Step 2 – Install the Rackmount Kit on the Chassis
A rackmount rail kit is included with VideoX V4 Value Enterprise Appliance. Refer to the documentation shipped with the rackmount rail kit.
Step 3 – Cabling the VideoX V4 Value Enterprise
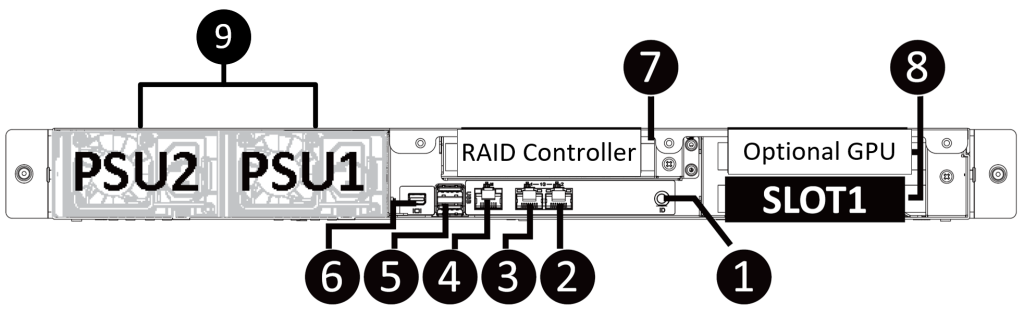
- The VideoX V4 Value Enterprise Appliance requires two AC power sources (9). Connect both power cords.
- Connect a monitor to the mini display port (or use the mini display port to VGA adaptor) (6).
- Connect a keyboard and mouse to any available USB port (5).
- Network connectivity is required during the operation of the VideoX V4 Value Enterprise. Plug in at least one Ethernet cable into an Ethernet port of the VideoX V4 Value Enterprise (2 or 3).
- A network cable should also be connected to the management port for later usage (4).
Step 4 – Power on the server
Before powering on the VideoX V4 Value Enterprise, allow the system to complete its pre power on check. Allow the VideoX V4 Value Enterprise to boot into Windows® 2022 Server operating system.
Step 5 – Windows® Setup

Once the VideoX V4 Value Enterprise completely boots, follow the onscreen instructions to complete the configuration Windows® 2022 Server.
- Select the correct country/region, preferred app language, and keyboard layout that are appropriate. Click Next to continue.

- The product key is found on the Microsoft® Certificate of Authenticity (COA) label located on the front left corner of the appliance. Similar to the removable material commonly found on lottery tickets or prize vouchers, this concealment panel is designed to protect the consumer’s product key from being obtained and used by unauthorized individuals. Carefully scratch off the concealment coating with a fingernail or coin to reveal the entire product key.
Arxys is unable to recover or provide an alternate product key should the COA be damaged.
Click Next. - Review and accept the Microsoft® Software License Terms and click Accept.
- Follow the instructions to set the administrative password for the appliance. Please note that the appliance ships without an administrative password. The password set here will create the only set of credentials that can be used to log into the appliance. Arxys is unable to reset this account.

Step 6 – Logging into the VideoX V4 Value Enterprise
Follow the onscreen instructions to log in using the password set in step 5.4
Step 7 – Installation of Video Management Software
The VideoX V4 Value Enterprise can be shipped with various video management platform packages. If a specific VMS package was requested with the purchase of the appliance, the platform installation package will auto run when the system is first used. The platform installation packages will be located in the folder located at C:\ArxysSupport\Applications. For additional information on installing, licensing, and configuring VMS see the VMS documentation.
Step 8 – Windows Updates
The VideoX V4 Value Enterprise ships with the Windows® Server 2022 operating appliance. Microsoft® routinely release updates and patches to improve stability and security. Any updates released after the VideoX V4 Value Enterprise has shipped will need to be applied.


