
What is Included #
1x VideoX V4 Workstation
1x AC power cord
4x Mini DisplayPort to DisplayPort adaptors (W5/W7/W9 models)
8x Mini DisplayPort to DisplayPort adaptors (W8 model only)
Step 1 – Unpack the workstation #
The VideoX V4 Workstation is shipped fully configured. All drives are installed at the factory. Carefully remove the VideoX V4 Workstation from its shipping box. Remove the workstation from the plastic bag.
Step 2 – Cabling the workstation #
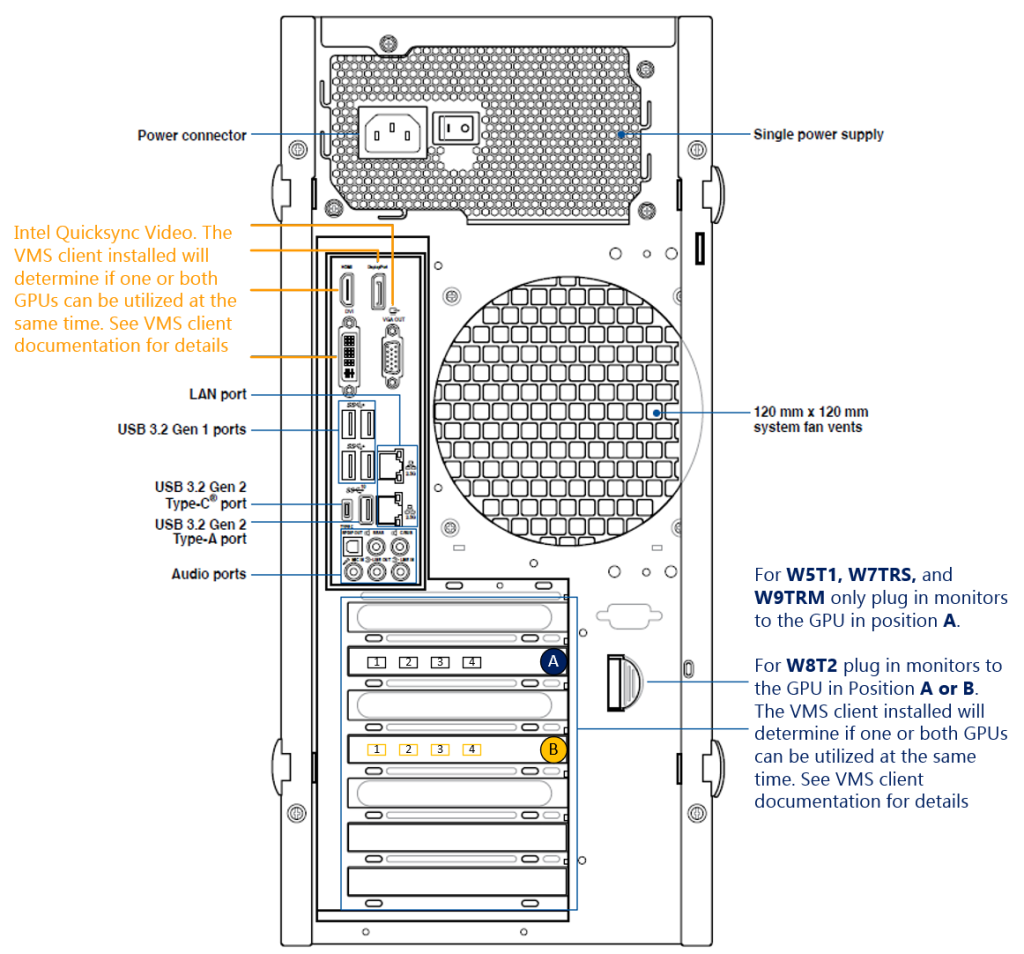
The VideoX V4 Workstation requires a single 100-240 VAC power source. Verify that the power supply switch is in the on ( | ) position. Connect 1 to 4 monitors to the GPU in position A. Connecting additional monitors to any other video ports will reduce to total bandwidth the VideoX V4 Workstation can support. See VMS client documentation for details. Connect a keyboard and mouse to any available USB port. Connect at least one Ethernet cable for basic network connectivity.
Step 3 – Power on the workstation #
To turn on VideoX V4 Workstation, press the triangular power button located on the middle front right of the system. The system will power on. If the workstation does power on verify that the power supply switch is in the on ( | ) position and that the power cable is connected to an appropriate power source. Allow the VideoX V4 Workstation to boot into Windows® 10 operating system.
Step 4 – Windows® Setup #
Once the Arxys VideoX Workstation completely boots, follow the on-screen instructions to complete the Windows® 10 Enterprise LTSC setup. Create a user and password for the system. It is highly recommended that a local account be created instead of an “online account” by selecting “domain join” and following the on-screen prompts to create a local account. If you are not sure how to create the account, please check with your system or network administrator for the best methods for your environment.
The password set here will create the only set of credentials that can be used to initially log into the system. Arxys is unable to reset this account. Do not lose this user name or password.
Step 5 – Logging in to the Workstation #
Follow the on-screen instructions to log in using the password set in step 4
Step 6 – Logging in to the Workstation #
The VideoX V4 Workstation supports various video management platforms. If a specific VMS package was requested with the purchase of the workstation, the platform installation package will auto run when the system is first used. Please be advised that the version of the software preloaded on the system may not be the most current version. If you are not sure about which version should be installed, please check with your system or network administrator for the correct version for your environment.
If you are not ready to install the video management software at this time, cancel and close the installation. When ready, the platform installation packages will be located in the folder located at C:\ArxysSupport\VMS and can be rerun. For additional information on installing, licensing, and configuring VMS see the VMS documentation.
Step 7 – Windows® Updates #
The Arxys VideoX V4 Workstation ships with the Windows® 10 Enterprise LTSC operating system. Microsoft® routinely releases updates and patches to improve stability and security. Any updates released after the Arxys VideoX V4 Workstation has shipped will need to be applied.
Step 8 – Windows® 10 Power Settings #
The Arxys VideoX V4 Workstation ship with the Windows® 10 Enterprise LTSC operating system and are configured from the factory to use the “High performance” power setting. This prevents all power saving features from being utilized, ensuring peak performance and uninterrupted operation. Occasionally operating system updates may reset some or all of these settings. Additionally on enterprise networks group policy may be inadvertently set will change these settings.
- From the Windows 10 start menu click on settings (the gear)
- Click on the “System” option
- From the menu on the left hand side, click on “Power & sleep”
- On the right hand side under the section titled “Related settings” click “Additional power settings”
- A list of power plans will be displayed; set or verify that “High performance” is selected.
- High Performance will prevent the workstation from entering sleep mode.


